【Rails】capistranoを使用したAWSへのdeploy手順まとめ
はじめに
capistranoを使用したデプロイ手順についてまとめます。
目標は、デプロイしてブラウザでアクセスできることが確認できるまでです。
また、下記の設定が済んでいる前提になります。
最終的な構成
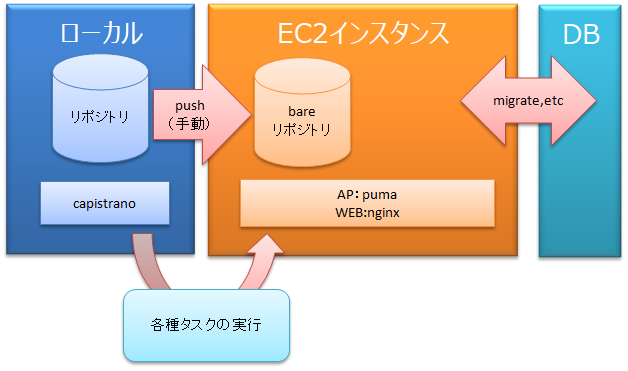
事前準備
EC2インスタンスに下記をインストール、設定します。
- git(bareリポジトリ作成)
- rbenv
- ruby
- bundler
- mysql-devel
- sqlite-devel
- nodejs
- nginx
git関連
以下のコマンドを実行し、gitをインストールします。
sudo yum update sudo yum install git
次にbareリポジトリを作成します。
# ディレクトリ作成
mkdir test-deploy.git
# 移動
cd test-deploy.git
# bareリポジトリ作成
git --bare init --shared
ruby関連
はじめに、以下のコマンドでrbenvをインストールします。
# 必要なライブラリの導入
sudo yum install -y git gcc gcc-c++ openssl-devel readline-devel
# rbenvの取得
git clone https://github.com/sstephenson/rbenv.git ~/.rbenv
# パスを通す
echo 'export PATH="$HOME/.rbenv/bin:$PATH"' >> ~/.bash_profile
echo 'eval "$(rbenv init -)"' >> ~/.bash_profile
# 設定の反映
source ~/.bash_profile
次に、下記のコマンドでrubyをインストールします。
# rbenvのプラグインの取得
git clone https://github.com/sstephenson/ruby-build.git ~/.rbenv/plugins/ruby-build
# rubyのインストール
rbenv install 2.5.3
# globalに設定
rbenv global 2.5.3
# コマンドを使用できるようにする
rbenv rehash
# bundlerのインストール
gem install bundler -v 1.17.2
bundlerのバージョンは、デプロイするプログラムのGemfile.lockに記載のあるBUNDLED WITHと同じにする。
でないと、
can’t find gem bundler (>= 0.a) with executable bundle というエラーが発生した。
MySql関連
以下のコマンドを実行し、mysql-devel、sqlite-develをインストールします。
sudo yum install mysql-devel sudo yum install sqlite-devel
nodejs関連
以下のコマンドを実行し、nodejsをインストールします。
curl --silent --location https://rpm.nodesource.com/setup_8.x | sudo bash -
sudo yum -y install nodejs
nginx関連
以下のコマンドを実行し、nginxをインストールします。
sudo amazon-linux-extras install nginx1.12
設定ファイルの編集、作成
nginx.confの設定を行います。
下記のような設定を行いました。
- user
- error_logの出力先
- server_names_hash_bucket_size(サーバー名が長かったので)
- root(コメントアウト)
nginx:nginx.conf
# For more information on configuration, see:
#   * Official English Documentation: http://nginx.org/en/docs/
#   * Official Russian Documentation: http://nginx.org/ru/docs/

#user nginx;
user ec2-user;
worker_processes auto;
#error_log /var/log/nginx/error.log;
error_log /home/ec2-user/test-deploy/shared/log/nginx_error.log;
pid /run/nginx.pid;

# Load dynamic modules. See /usr/share/nginx/README.dynamic.
include /usr/share/nginx/modules/*.conf;

events {
    worker_connections 1024;
}

http {
    log_format  main  '$remote_addr - $remote_user [$time_local] "$request" '
                      '$status $body_bytes_sent "$http_referer" '
                      '"$http_user_agent" "$http_x_forwarded_for"';

    access_log  /var/log/nginx/access.log  main;

    sendfile            on;
    tcp_nopush          on;
    tcp_nodelay         on;
    keepalive_timeout   65;
    types_hash_max_size 2048;
    server_names_hash_bucket_size 70;

    include             /etc/nginx/mime.types;
    default_type        application/octet-stream;

    # Load modular configuration files from the /etc/nginx/conf.d directory.
    # See http://nginx.org/en/docs/ngx_core_module.html#include
    # for more information.
    include /etc/nginx/conf.d/*.conf;

    server {
        listen       80 default_server;
        listen       [::]:80 default_server;
        server_name  13.230.164.25;
        #root         /home/ec2-user/test-deploy/current/public;
        #root         /usr/share/nginx/html;

        # Load configuration files for the default server block.
        include /etc/nginx/default.d/*.conf;

        location / {
        }

        error_page 404 /404.html;
            location = /40x.html {
        }

        error_page 500 502 503 504 /50x.html;
            location = /50x.html {
        }
    }

# Settings for a TLS enabled server.
#
#    server {
#        listen       443 ssl http2 default_server;
#        listen       [::]:443 ssl http2 default_server;
#        server_name  _;
#        root         /usr/share/nginx/html;
#
#        ssl_certificate "/etc/pki/nginx/server.crt";
#        ssl_certificate_key "/etc/pki/nginx/private/server.key";
#        ssl_session_cache shared:SSL:1m;
#        ssl_session_timeout  10m;
#        ssl_ciphers HIGH:!aNULL:!MD5;
#        ssl_prefer_server_ciphers on;
#
#        # Load configuration files for the default server block.
#        include /etc/nginx/default.d/*.conf;
#
#        location / {
#        }
#
#        error_page 404 /404.html;
#            location = /40x.html {
#        }
#
#        error_page 500 502 503 504 /50x.html;
#            location = /50x.html {
#        }
#    }

}
nginx:conf.d/app.conf(新規作成)
upstream backend {
  server unix:///home/ec2-user/test-deploy/shared/tmp/sockets/puma.sock;
}

server {
    listen 80;
    server_name ec2-13-230-164-25.ap-northeast-1.compute.amazonaws.com;
    root /home/ec2-user/test-deploy/current/public;

    location /favicon {
        empty_gif;
        access_log off;
        log_not_found off;
    }
    location / {
        proxy_pass http://backend;
        proxy_redirect off;
        proxy_set_header Host $host;
        proxy_set_header X-Forwarded-For $proxy_add_x_forwarded_for;
        proxy_set_header X-Forwarded-Host $host;
        proxy_set_header X-Forwarded-Server $host;
        proxy_set_header X-Real-IP $remote_addr;
    }
    location ~ ^/assets/ {
    root /home/ec2-user/test-deploy/current/public;
    }
}
追記(2019/08/26)
本番環境だとpbulic下にアセットファイルができるので参照できるようにlocation ~ ^/assets/の部分を追加しました。
この設定がないと以下のようなエラーが発生します。
INFO -- : [6b59ac3b-1efe-4982-9bff-e47c16c224f5] Started GET "/assets/application-c5fdc0d3ee5f67b3a42af3160c54d3f9c3d003a0642d725f2eac9f2b5d9c5a4d.js" for 153.206.35.90 at 2019-08-21 12:36:21 +0000
F, [2019-08-21T12:36:21.934421 #4152] FATAL -- : [6b59ac3b-1efe-4982-9bff-e47c16c224f5]
F, [2019-08-21T12:36:21.934452 #4152] FATAL -- : [6b59ac3b-1efe-4982-9bff-e47c16c224f5] ActionController::RoutingError (No route matches [GET] "/assets/application-c5fdc0d3ee5f67b3a42af3160c54d3f9c3d003a0642d725f2eac9f2b5d9c5a4d.js"):
/var/lib配下のnginxのディレクトリのオーナー変更
# 初期状態
drwx------  3 nginx   nginx     17  8月 19 14:38 nginx
# 初期の状態では、上記のようになっているので、下記のコマンドで所有者をec2-userに変更する。
sudo chown -R ec2-user /var/lib/nginx

結果
drwx------  3 ec2-user nginx     17  8月 19 14:38 nginx
# ファイルをアップロードする機能がある場合、設定しないと下記のようなエラーが出るので設定します。
2019/08/21 12:51:52 [crit] 12121#0: *89 open() "/var/lib/nginx/tmp/client_body/0000000004" failed (13: Permission denied)
テスト
nginxのテストコマンドは下記のものです。
sudo nginx -t
nginx: configuration file /etc/nginx/nginx.conf test is successful
が表示されれば大丈夫です。 ※指定したディレクトリがないとエラーになるのでその場合は、デプロイ後に確認
capistrano関連
ここからはローカルでの作業になります。
インストール
Gemfileに以下のGemを追加します。
capistrano-XXXXXXXはとりあえず下記を追加。(使わないものもあるかも・・)
追加後、bundle installを行います。
group :development do
  gem "capistrano", "~> 3.10", require: false
  gem "capistrano-rails", "~> 1.4", require: false
  gem 'capistrano-bundler'
  gem 'capistrano-rails-console'
  gem 'capistrano-rbenv'
  gem 'capistrano-rbenv-vars'
  gem 'capistrano-sidekiq'
  gem 'capistrano3-puma'
  gem 'capistrano-ssh-doctor', git: 'https://github.com/capistrano-plugins/capistrano-ssh-doctor.git'
end
設定ファイル作成
下記のコマンドを実行し、capistranoの設定ファイルを作成します。
bundle exec cap install
実行結果
$ docker-compose exec app bundle exec cap install
mkdir -p config/deploy
create config/deploy.rb
create config/deploy/staging.rb
create config/deploy/production.rb
mkdir -p lib/capistrano/tasks
create Capfile
Capified
config直下のdeployファイルがすべての環境に適用する設定、
config/deploy以下のファイルが各環境ごとの設定を記載するファイルになるようです。
deploy設定
deploy用の設定を記載します
今回は、config/deploy/staging.rbにRAILS_MASTER_KEYをベタがきしていますが、間違ってコミット、プッシュしてしまう可能性もあるので、
master.keyは手動でshared/config/master.keyを作成し、ローカルの内容をコピー
config/deploy.rbに
append :linked_files, "config/master.key"
を追加する方がベター(参考)
config/deploy/staging.rb
# 環境指定
set :rails_env, 'production'

# サーバー、ユーザー、ロールの指定
server "ec2-13-230-164-25.ap-northeast-1.compute.amazonaws.com", user: "ec2-user", roles: %w{app db web}

# デプロイ先のリポジトリ指定(/home/ec2-user/test-deploy.git)
set :repo_url, "/home/ec2-user/test-deploy.git"

# デプロイするブランチ指定
set :branch, 'how_to_capistrano'

# 環境変数の指定
set :default_env, {
  test: "test_data",
  RAILS_MASTER_KEY: "XXXXXXXXXXXXXXXXX"
}

# SSHの設定
set :ssh_options, {
  keys: %w(env-test.pem),
  forward_agent: false
}
config/deploy.rb
# config valid for current version and patch releases of Capistrano
lock "~> 3.11.0"

set :application, "test_deploy"

# 指定のディレクトリのシンボルを作成
set :linked_dirs, %w(log)

# デプロイ先の指定
set :deploy_to, "/home/ec2-user/test-deploy"

# 指定のディレクトリのシンボルを作成
append :linked_dirs, "log", "tmp/pids", "tmp/cache", "tmp/sockets", "public/system", '.bundle'

namespace :deploy do
  desc 'restart nginx'
  task :nginx_restart do
    on roles(:app) do
      execute "sudo service nginx stop"
      execute "sudo service nginx start"
    end
  end
  after  :finished, :nginx_restart
end
Capfile
# Load DSL and set up stages
require "capistrano/setup"

# Include default deployment tasks
require "capistrano/deploy"

# Load the SCM plugin appropriate to your project:
#
# require "capistrano/scm/hg"
# install_plugin Capistrano::SCM::Hg
# or
# require "capistrano/scm/svn"
# install_plugin Capistrano::SCM::Svn
# or
require "capistrano/scm/git"
install_plugin Capistrano::SCM::Git

# Include tasks from other gems included in your Gemfile
#
# For documentation on these, see for example:
#
#   https://github.com/capistrano/rvm
#   https://github.com/capistrano/rbenv
#   https://github.com/capistrano/chruby
#   https://github.com/capistrano/bundler
#   https://github.com/capistrano/rails
#   https://github.com/capistrano/passenger
#
# require "capistrano/rvm"
require "capistrano/rbenv"
# require "capistrano/chruby"
require "capistrano/bundler"
require "capistrano/rails/assets"
require "capistrano/rails/migrations"
# require "capistrano/passenger"
require 'capistrano/ssh_doctor'

require 'capistrano/puma'
install_plugin Capistrano::Puma  # Default puma tasks

# Load custom tasks from `lib/capistrano/tasks` if you have any defined
Dir.glob("lib/capistrano/tasks/*.rake").each { |r| import r }
MySqlの設定
MySqlの接続情報をcredentials.yml.encに記載します。 まず、編集するために環境変数にEDITORを設定します。 私は、Dockerを使用しているのでdocker-compose.ymlに記載します。
docker-compose.yml
environment:
  RAILS_ENV: development
  EDITOR: vim #追加
その後、再起動し、下記コマンドを実行します。
rails credentials:edit
編集し、下記の内容を追加しました。
db:
  host: DBのエンドポイント
  database: testdb(DB名)
  username: ユーザー名
  password: パスワード
そして、この値をdatabase.ymlで取得できるように設定します
database.yml
production:
  <<: *default
  host:     <%= Rails.application.credentials.db[:host] %>
  database: <%= Rails.application.credentials.db[:database] %>
  username: <%= Rails.application.credentials.db[:username] %>
  password: <%= Rails.application.credentials.db[:password] %>
ソースのPush
以下のコマンドでサーバーのリポジトリにpushします。
GIT_SSH_COMMAND='ssh -i 鍵.pem' git push ssh://サーバー名/home/ec2-user/test-deploy.git
deploy
以下のコマンドで デプロイを行います。
bundle exec cap staging deploy
deploy後、ブラウザでアクセスできればOKです。
初回実行時はmigrationの際にDBがなくて失敗します。
ファイル自体はEC2にアップロードされているので、sshで入ってrailsのコマンドでdbを作成した後に再度上記のデプロイコマンドで実行で上手くいきます。
補足 デプロイ時にpumaの設定ファイルが自動生成されるので、デフォルト(config/puma.rb)は使用しません。
00:00 puma:check
  WARN  puma.rb NOT FOUND!
  Uploading /home/ec2-user/test-deploy/shared/puma.rb 100.0%
  puma.rb generated
今回、nginxの設定は手動でおこないましたが、
Capistrano::Pumaを見る限りこちらも自動化できるみたいです。